Posted by: Garlak in Articles
When launching your own business, it can be difficult to become a Jack of all trades. Rather than being a full time employed specialist, you now have to wear the hat of the marketing bod, the financial guru, the social media manager, the blogger, the advertising whizz as well as the head honcho. This can be difficult to manage. However, there are ways to ease this burden. Focus on one aspect of your business at once before you launch and hone your strategy and processes. When looking at marketing your business, make sure that you maximize your visibility online to convert hits to sales and to generate as much exposure for your brand as possible. Take a look at these three marketing tactics that you must employ for your startup. (more…)

Posted by: Garlak in Articles
There is no denying that marketing effectively is a necessity for businesses today. However, with so many different marketing approaches and techniques to choose from, it can be difficult to know what to do next. There is no need to worry, as we’re going to help on that front. Read on to discover what should be at the top of your marketing to-do list.
source https://pixabay.com/photos/mobile-phone-smartphone-keyboard-1917737/
Have an SEO audit – The first thing you need to do is get in touch with a professional company for an independent SEO audit. This will help you to get an understanding of how your SEO campaign is currently performing and where changes need to be made. You will figure out what you’re doing right, where you’re going wrong, and opportunities that you are missing out on. A professional SEO audit is a must if you are going to direct your marketing efforts effectively. (more…)
Posted by: Garlak in Tutorials
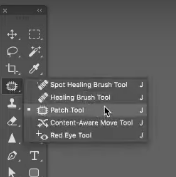
The patch tool in Photoshop is one of the fundamental elements that set this fantastic program apart from the rest. Being able to remove an object from an image is one of the primary benefits of using Photoshop. The patch tool is the easiest way to do that.
In combination with the Spot Healing Brush and the Healing Brush, the Patch Tool serves as the staple for removing unwanted objects from an image. Whether it’s a random person in the background who happened to photobomb your picture or your team forgot to remove that distracting book on the desk, there are times when you need to get rid of things.
What Exactly is the Patch Tool Photoshop?
This tool is found in the toolbox and is one of the many brushes listed under the healing brush toolset. It’s used to remove or repair more extensive areas of an image. Although it works in much the same way as the other healing tools, it will utilize sections of the image as defined by the user.
To put it in layman’s terms, the patch tool in photoshop makes it easier to touch up larger sections since you don’t have to brush it using the other touch up tools manually. You select an area and then move it all at once. (more…)

Posted by: Garlak in Articles
When your website has been established for some time and your profits are not increasing at a rate you are happy with, you may want to think about branching out and changing some aspects of your business plan to get back on track to reach your goals triumphantly. There are a few simple tips that can help you increase the income you receive from your site without going to too much trouble, so there’s really no excuse for you not to get started today. (more…)

Posted by: Garlak in Articles, Tutorials
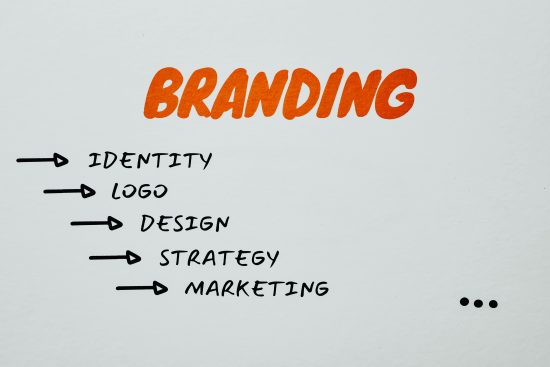
What makes a business thrive or what causes a boost in sales? Apart from the essential commodities, what makes a product sell? The answer is good marketing.
Source
In this age of technology, there is an increasing online presence of businesses of varying domains who want to be heard and seen. So, what needs to be done to direct people towards a webpage? The answer is creating high-quality content.
High-quality content should not only catch the attention of your target audience but stand out from the countless other options that is available online. (more…)

Posted by: Garlak in Articles
The demands placed on data centres in the current day and age are growing by the minute. The increased need for new applications has meant that data centres require more space and more power than ever before. This is actually the case for rooms that aren’t even full. This problem is enhanced even further because of IT asset nameplates’ power consumption. IT asset nameplates tend to overstate power consumptions levels for networking equipment, storage devices and of course services. So, how do data centres combat this difficult problem? Well, it all lies within capacity management and using power consumption information to manage effectively. (more…)

Posted by: Ravi Sharma in Tutorials
The process to design clean and effective web design is more than essential for every website designer. Especially, when you need to work on photoshop to create a layout for your dream website, it can be overwhelming to work on it. Therefore, to make it more convenient for you to create a unique and responsive web design using Photoshop, here we have a complete guide to follow shared by the experts from a web design company. Let’s just quickly move on it.
Before we work on the design, it is essential for us to work all the requirements. Once we have a brief picture of what we need, we can start fit them in visuals on Photoshop before execution. We call them mockups and wireframes as it helps to ensure flexibility with designs. Most of the time, it is recommended to prefer the use of grays or tones of yellow can help you concentrate better on design. (more…)

Posted by: Garlak in Photography
Image editing is a common term in making a photo more stunning and perfect. Everyone won’t understand the importance of this post-production work. But it’s a kind of compulsory requirement for photographers before presenting the photo to the world. Some confusion may arise for the beginner like why need image editing service for a photographer? It can be clarified by some step by step discussion. Let’s see how I am going to brief this!
Photography is not the same for everyone in some specific ways. In the present time, photography occupies an essential part of our life. Some people take this as fun, while some take it as their professions. It is tough to take care of your unprocessed photos alone. That is a reason you need a professional photo editing service to help you solve all these hassles.
Image editing is a phase of choosing a series of photos to be used as a part of a project. The necessary step makes it possible to turn the picture into a storyteller. Let’s have a look at how a project of photography creation starts and finalizes!
(more…)