How To Create A Professional Web Layout In Photoshop
The process to design clean and effective web design is more than essential for every website designer. Especially, when you need to work on photoshop to create a layout for your dream website, it can be overwhelming to work on it. Therefore, to make it more convenient for you to create a unique and responsive web design using Photoshop, here we have a complete guide to follow shared by the experts from a web design company. Let’s just quickly move on it.
Before we work on the design, it is essential for us to work all the requirements. Once we have a brief picture of what we need, we can start fit them in visuals on Photoshop before execution. We call them mockups and wireframes as it helps to ensure flexibility with designs. Most of the time, it is recommended to prefer the use of grays or tones of yellow can help you concentrate better on design.
Once you have a layout of your design, all you need to do is set the canvas for your goals. You can specify the width and height of the document to ensure the most comfortable work base. However, you may still need to decide the work area by using the command Ctrl+A and then go to transform selection to shrink the selected area and adding guidelines to the selected area. For example, if you have set the width to 1200px, you may define the height to be 1800px. Further, you can decide the area which needs to be added with the images so that you can place rectangles of relevant size on the working space.
The next step which you have to take is to define the areas on the website for content like text and images. This may need you to pick the rectangle option in the toolbar and place it on the workspace. You have to work this arrangement very carefully considering space for the main featured image of the website as well as other images you may add for products or services. You can also define any color of your choice to highlight the area where you may place your major images.
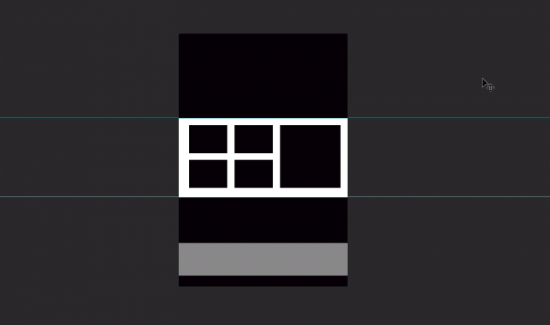
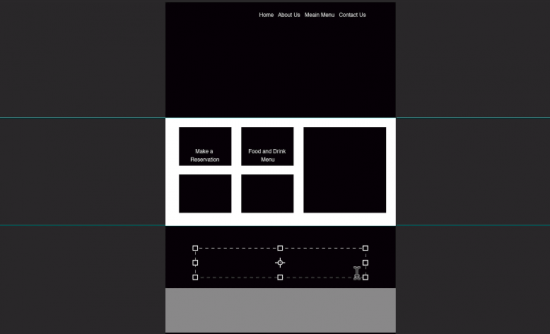
When done, the next task which you have to work creates small rectangles on the sheet to represent your services or products. These may be categories or products which can be featured using 4, 6, or 8 boxes. This may need us to create rectangles of different or same sizes. To create these boxes faster, all you have to do is hold the alt key and drag/drop the rectangles to the desired place. However, if you want to resize any box, you can simply opt for use of command T or transformation tool for varying the size. Further, if you need to get any area covered, you can use the extended rectangle with alt key to creating a duplicate.
However, to create distinctions in the sections, let’s say footer, we may need to do some variations with the colors. It is always better to stay with blacks and grays for creating a mockup as it is easier to read. Further, you can even go for the use of white to define the layout of the services or product area which you want to feature. Now, this will help us get five different sections, one will have a display image, then we can have services followed by the content for testimonials, blank space for other content and then the footer of the website.
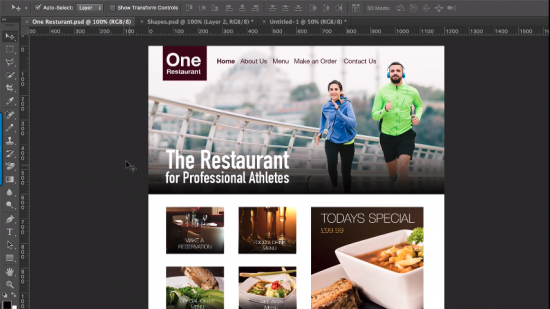
The next step would be adding the text to the layout in which we will define all the pages of our website. We can write to them as home page, about us, menu or services, and then contact us. Further, you can opt for the style which you think will be perfect for displaying on the text on your website. Make sure the size you pick should never be too big or too small. Further, you can write the content for the services box as well. Once done with the service boxes, you can add the content to the third section of the website by defining the portion in which you need the text. When done, you can use command Ctrl+V to paste the copied content of your website.
The next step which you need to perform uses the lips tool to draw a small circle in the testimonial section. Once done, you can drag any color of your choice to highlight the circled portion. This highlighted circle would be the area where we would be adding the image.
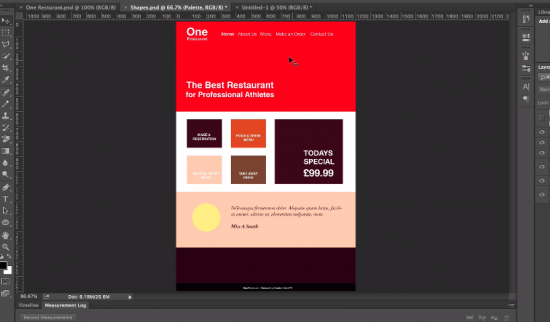
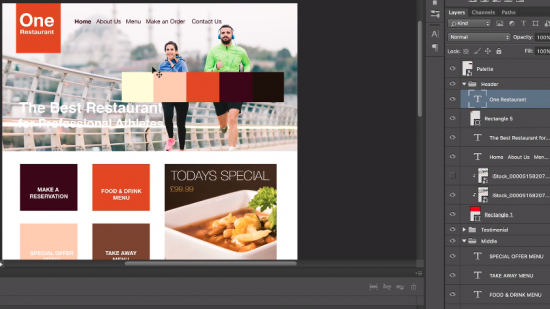
Once we are done with a brief layout of the website design, we may need to add colors that can describe our website in the best possible manner. To do this, you can reach for adobe cooler and explore all the color options available for you to use. For instance, if you have a restaurant option, you can add the keyword to the search and it will bring you results for all colors which are good for restaurants. When done picking your choice, you can take a screenshot and add it to the photoshop. Before you proceed with any color alterations, you can add the relevant names to the sections or layers you see on the RHS of the screen. You can also group the menu or services section by using command G. once done, we can proceed with the next step of adding images.
This may need you to pick all the images that suit your business just like the way you can explore in the tutorial. All you need to do is pick the images that are relevant to your business. Working on this layout does not need you to do intense efforts on design as you can easily work on the layout and pick those image and colors which you think are good for your website.
The best part of using photoshop for your website design is that you can plan a dedicated folder from which you can drag/drop all the images you need to your layout. But to define the dedicated images, you can simply go for clipping of image between layers using the alt key. This will help you go for any zoom or enlargement you want to do with the image without any fear to change of position with command T. when done, press enters to fix the picture in the layout.
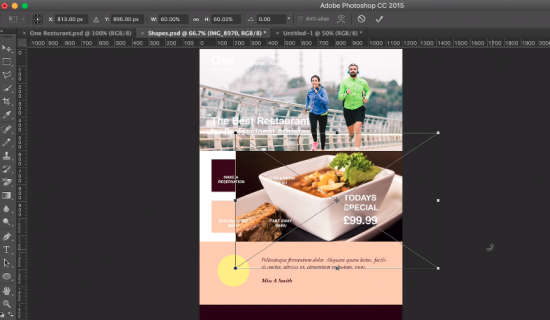
Also, you can drag and drop all the images which you have for your services and clip them for a perfect design. This also needs you to follow a similar process where you can define the layer of use for the image and follow the size which is perfect for your design. However, you have to move the text around the image finding the most appropriate position of the content. Also, if you need to create any highlights, you can do so by picking the colors from the image to improve the consistency.
The next step would need you to fix the colors of the menu bar on the top of website which features all the pages like home, about us, contact us, etc. this may need you to adjust the font size for finding the perfect fit for the content saving space for logo on the upper LHS of the featured image. Also, to design a logo, you may need to select the area where you want to place the logo choosing a particular shape.
Suppose, we pick a rectangle again. You can change its color and then place the content inside the space by dragging content into the new rectangle layer you have created. Further, you can add the content like slogan or tagline at the areas which you need to be a display for text. Following the above process, you can easily add images to the left out areas in the services or menu section as well as testimonials.
In case you have issues placing your content on the images like the use of white content on an image that has very much white on it, you can simply pick to add a gradient. It just needs you to hit the top right corner of the screen and pick the color for the gradient that can enhance the content. This can also be done on other images to make the content more presentable and easy to read. You can also have a look on this video to learn this in more depth.
So, if you are planning to create a unique and effective layout for your website using photoshop, now you have got a grip on all the tactics that can work for you. However, you can also follow a similar process to create a more defined and professional web layout for any type of business. All the best!
About the Author: Ravi Sharma
 Ravi Sharma is a young and highly dedicated entrepreneur who has shown intense enhusiasm in building his App development brand, Webomaze. He has a great direction on the idea of creative and user-friendly app development that can promote business growth and goals, He loves to seek adventure by exploring different places.