
Removing Objects with the Patch Tool in Photoshop
The patch tool in Photoshop is one of the fundamental elements that set this fantastic program apart from the rest. Being able to remove an object from an image is one of the primary benefits of using Photoshop. The patch tool is the easiest way to do that.
In combination with the Spot Healing Brush and the Healing Brush, the Patch Tool serves as the staple for removing unwanted objects from an image. Whether it’s a random person in the background who happened to photobomb your picture or your team forgot to remove that distracting book on the desk, there are times when you need to get rid of things.
What Exactly is the Patch Tool Photoshop?
This tool is found in the toolbox and is one of the many brushes listed under the healing brush toolset. It’s used to remove or repair more extensive areas of an image. Although it works in much the same way as the other healing tools, it will utilize sections of the image as defined by the user.
To put it in layman’s terms, the patch tool in photoshop makes it easier to touch up larger sections since you don’t have to brush it using the other touch up tools manually. You select an area and then move it all at once.
Tutorial: How to Use the Patch Tool in Photoshop to Remove an Unwanted Object
With some images, it’s easy to remove an unwanted object, especially if it’s massive. But this might become more complicated, depending on the model. Here is a quick tutorial.
Tutorial Goal
This tutorial is going to show you how to remove an object from a photo using the Patch Tool under Normal Mode. Use this if you have a large object in an image that you would like to remove. It’s effortless.
Warning: Always create a backup of your image just in case something goes wrong. You do not want to risk losing your original.
Step 1: Locate the Patch Tool
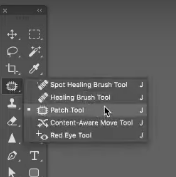
1. You can find the Patch Tool by clicking on the Selection Panel from the Toolbox as shown in the image below. The Spot Healing Brush Tool and the Healing Brush Tool are both great tools for removing small objects. If the purpose is large, then you’ll want to use the Patch Tool.
2. Click on Patch Tool. If you look at the top of the screen, you will see a drop-down menu with two options. Make sure this is set to Normal.

Note: For advanced object removal, you can use the Content-Aware option. If you do this, make sure that you create a New Layer so that you don’t damage the image.
Step 2: Create a New Layer
Now we need to create a New Layer so that we don’t damage the main image with this tool.
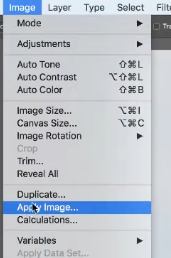
1. From the Menu, click on Image and then Apply Image. This pulls up a new window.
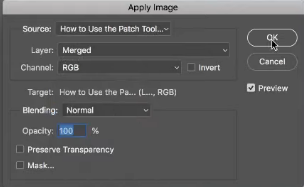
2. Set the Layers panel to Merge.
3. Set Blending to Normal.
4. Press the OK button.
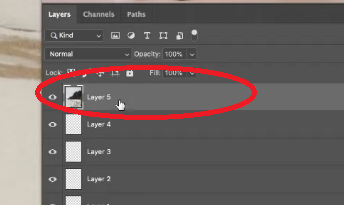
 What this does is creates a New Layer that is a copy of your image. We do this to avoid messing up our original image. In short, you can use your Normal Patch Tool on this New Layer.
Step 3(a): Remove the Object Using the “Source” Setting
Next we will have a couple of different options – Source and Destination.
1. Make sure that Source is selected.

2. Verify that you have the Layer that we created in the previous step selected.

3. Identify the object that you want to remove. Click and drag your mouse around the object. If everything is set correctly as described thus far, the tool will draw a Selection Area around the image.
4. Encompass the whole object with the Selection Tool. Then Click and Drag it into a new area. This is where it can get a little tricky. You’ll notice that as you move the selected object along the screen, Photoshop replaces the area where the image used to be with the texture of the location you are scrolling over. Keep dragging your mouse until you find an area that has a similar texture, so that it doesn’t look awkward. Once you find the right look, let go of the mouse button.
The object you had selected should disappear completely.
5. Repeat this for every large object in the image that you want to remove.
Step 3 (b): Remove the Object Using the “Destination” Setting
Our previous step showed you how to use the Source option, but there might be times when it’s best to use the Destination option. This is an entirely optional step. In most cases, you will use a combination of both to get your image perfect.
1. At the top of the screen, make sure that Destination is selected.

2. Verify that you have the Layer that we created in the previous step selected.
3. Instead of drawing the selection tool around the object you want to remove (Source), we are going to find an area that has the same texture background as the object you want to remove.
4. Once you select that area of the background, notice how it does the exact opposite as it did with Source selected. When you click and drag the selection, instead of replacing the Source with the new texture, it will apply your chosen area to the Destination. You’ll need to play around with this a bit to see the difference with your own eyes.
Note: Use a combination of the Source and Destination settings in the Patch Tool to touch up the image.
Final Thoughts
Practice makes perfect, so it might take some time to get a feel for how this amazing feature works. Just remember that the patch tool can only be used under the right conditions. Advanced object removal might be best left up to experts like the Artwork Adobe Company.
I hope this tutorial helps you get rid of distractions so that you can give the audience’s full attention to the main object.
About the Author: Garlak Theodorakis
 My name is Garlak Theodorakis, I am graphic designer with almost 10 year experience in the field. Founded Tooft.com in january 2010 with idea to share my knowledge with the world.