HDR Basics: A Fast & Dirty Run Down On Creating High Dynamic Range Images In Photoshop
What is HDR Imaging, and what’s all the fuss about it?
High-dynamic-range imaging (HDRI) is a technique used to create images with a wider dynamic range of luminosity than is possible with standard digital or photographic techniques. The aim is to reproduce the same range of luminance as the human eye. Our natural vision can constantly adjust to translate the broadest possible range of luminance available. Normal images are too flat for this. Since our eyes provide our brains with maximum detail by constantly changing to extract the best info under varying light conditions based on where we look, HDR images combine multiple levels of detail and contrast extracted from multiple flat versions of the same image, shot in different levels of light. Such combined images can contain much more collected detail than any of the original source images.
One common way HDR images are created is to take a series of images of the same scene or subject matter– some over-exposed, others under-exposed (between 3 and 5 is a good number of variations) and merge them together so different details from all the combined images get displayed to their best advantage in the combined HDR image. In effect, tou produce a single photo with the combined detail of multiple light levels.
There are three ways to make an HDR image: shoot it with a special HDR camera; create it manually in a photo editing program; or use an automated function to have Photoshop create it for you. HDR cameras aren’t the topic of this tutorial, so we’ll focus on doing the last two.
Creating an HDR Image Manually in Photoshop
First let’s learn how to create an HDR image manually, using the layer function in Photoshop CS5. Please note that when shooting images for conversion to HDR, you want to shoot them on a decent quality tripod, preferably with a built-in bubble level. The level is important to the end result: working from leveled images shot on a locked-off tripod makes it much easier to combine them later on without loss of image quality.
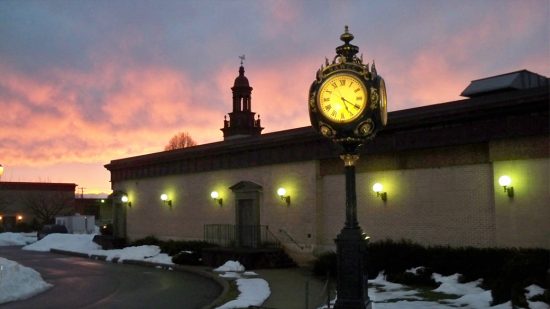
First, pick your subject, level your camera, and shoot your series of photos. For best results, shoot in RAW for greater editing power once you get the images into Photoshop. You’ll want to produce an even range of exposures: identically composed shots of still subjects, exposed at different light levels. Changing your shutter speed will change the exposure (but don’t mess with the aperture or you’ll change the depth of field, which can blur some areas of your photos). You can also adjust the ISO, but try to avoid it since it can cause unwanted image noise. Make sure your darkest image is underexposed by at least 1 stop. For a 5 shot spread, go darker and create an image under-exposed by 2 stops. Then do the same thing again, except this time over-exposing each shot.
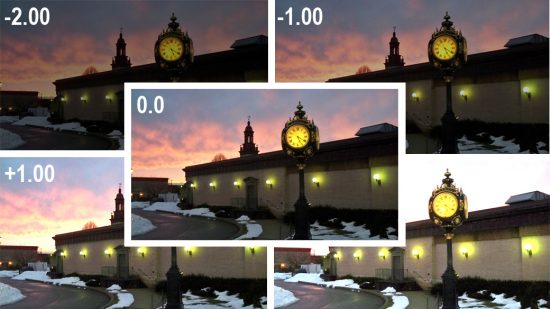
Adjust upward or downward from the baseline to create a full spread; you might do a five shot series at -2.00/-1.00/0.0/+1.00/+2.00/ or some other range. Whatever gives you the number of shots you want combined. Use as many exposures as you want, but be careful: the more shots you combine, the harder it will be to match them all up later.
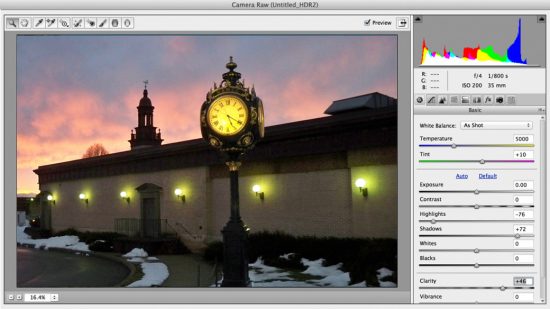
Once you have your shots, open them all in Adobe Camera Raw. On the underexposed images, adjust your fill light to bring out detail in all shadows. You may need to adjust recovery a little. Adjust temperature and tint to account for any ugly extremes or variations in color. When you’re happy with the result, move on to the next underexposed image and repeat the process, finding the best level of detail in each variation as you go.
Then turn your attention to the overexposed images, and tweak the fill light to get the best level of detail for each one of those. Adjust temperature and tint again on each new image, creating a range of exposures from dark to light, all with the best detail level you can get.
Now open them all in Photoshop. Create a new blank image file (the same size as the others) as a plain white background. Then copy/paste or drag-n-drop each of the project images as new layers, with the darkest underexposed layers on the bottom, each layer becoming progressively lighter/overexposed.
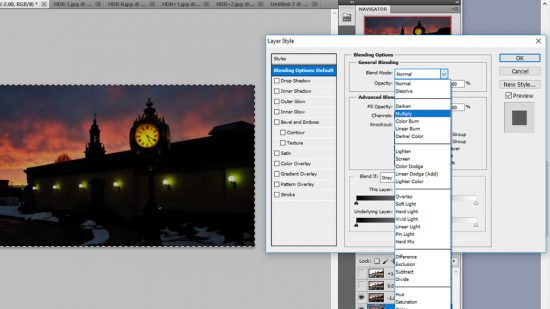
On your topmost overexposed layer, apply the multiply blending change. This should begin the process of tone mapping the image.
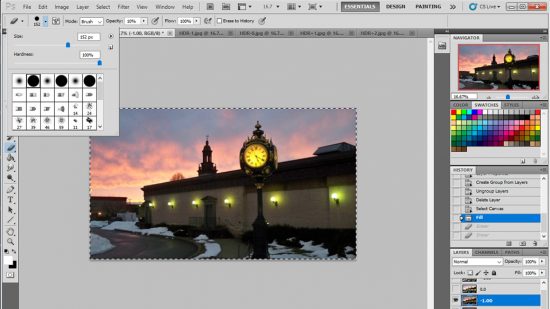
Now you can start stacking and manually touching up combinations of the various layers. You can do this either by masking sections of the stacked images, or by editing the top layer with your eraser tool to allow selected details from the layer below to show through the upper layer, blending the best elements of the combined layers in unison. Choose the eraser tool and keep the opacity level to a setting lower than 10%, and use an appropriate sized large brush. You should be able to see elements of the darker layer below peeking through your working layer. Keep going until you are satisfied.
Afterward, use selective color, color balance and local desaturation to finalize color correction in your new HDR image.
How to merge the range of images automatically in Photoshop
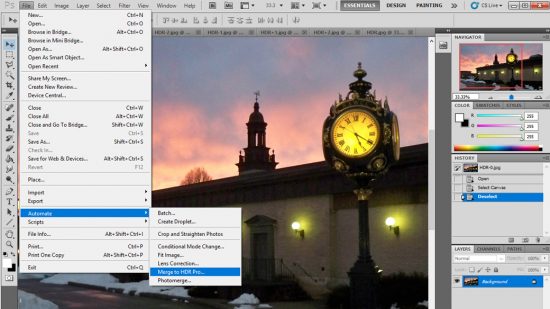
Step 1. Open Photoshop and choose File > Automate > Merge to HDR Pro. Choose the pre-prepared your source images you have shot in advance (see above). Select the option “Automatically Align Source Images.”

Step 2. Click “OK.” It may take a few seconds for Photoshop to process the files. When ready, select 32-bit depth for the widest amount of tonal range (8-bit and 16-bit file formats aren’t capable of storing sufficient data to record the full spectrum of tonal light).
Step 3. Check the 32-bit image preview for any ghosting or noise in the composite shot. If there is any, remove the source image which is causing the problem.
Step 4. Save the (extremely large) 32-bit preview shot for later use as a 32-bit (tiff, .pbm etc) HDR full of details.
Step 5. The merged result now is a floating-point 32-bit image. Choose Image > Mode > 8-bit. Use the resulting option dialogue to find the best exposure for your image. The HDR Toning Dialog has two options – Exposure and Gamma.
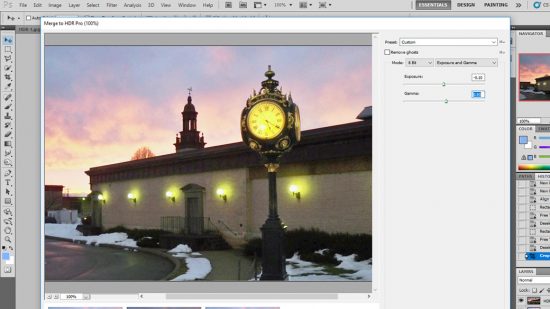
Step 6. Adjust the Gamma and the Exposure to really make your image pop. When you’re happy with the image, click OK and save the result.
Feel free to experiment to find the absolute best, most vibrant (and detail-packed) version of your new HDR image. You can return to your saved copy of the merged 32-bit image and re-edit it at any time, according to your liking.