
5 Tips to Perform Perfect Image Retouching
Photography is an art learned not only by the way a photographer spends time learning to capture images but the outcome of a good photography depends how well the photographer finessed that image to bring perfection. Photography may collaborate many perspectives pertaining to the image, but a deed to remember in all photography jobs is to ensure that you have made the final touch to it.
Sometimes in developing a craft, a photographer may seem to have fulfilled all the does and don’ts of photography but despite having all the composition and tricks sometimes the image does not turn out the way it was expected. And for some reason the image failed to grab the mark, which was supposed to be stunning like the way it was captured.
This occurs usually when photographers fail to run through those images in the final stages. Image retouching is done by fixing little problems and thus little adjustments are the photo editing magic which can enhance your picture to give a better outcome.
The Adobe Photoshop is the most popular and highly recommended photo editing tool used by many clipping path or image editing service providers. Many seasoned photographers use the Adobe Photoshop as their primary photo editing tool to edit image.
In Photo retouching – there is a difference when a photo is used to enhance than being overly photo shopped. An important aspect to remember in photo retouching; apply the changes in a manner that don’t spoil the picture and the alteration made on the picture don’t look too obvious. One mistake commonly found in many Photoshop users, is the usage of excessive photo retouching tools to enhance the image but they fail.
In this article we are sharing a few tricks and tips which you can follow in the post-processing stage of your image. This will give your images the artistic element you are looking for accordingly.
The following are the 5 quick tips for image retouching you need to know.
1. Adding Luminosity
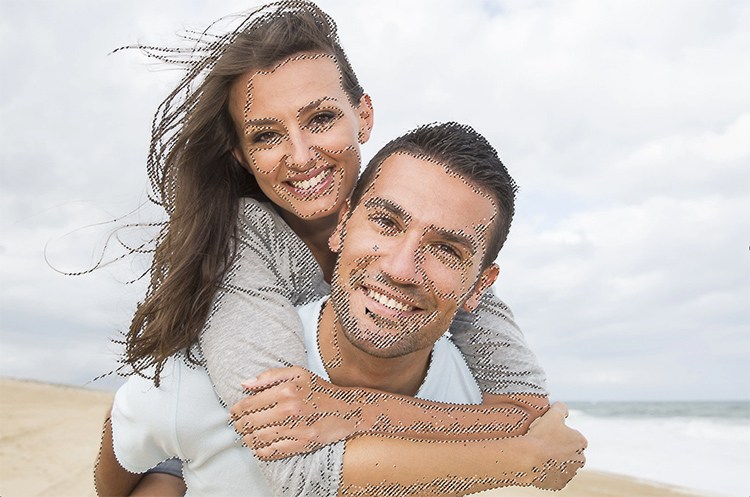
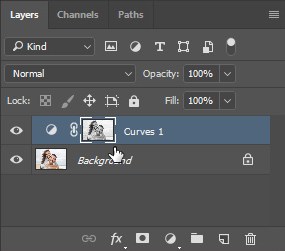
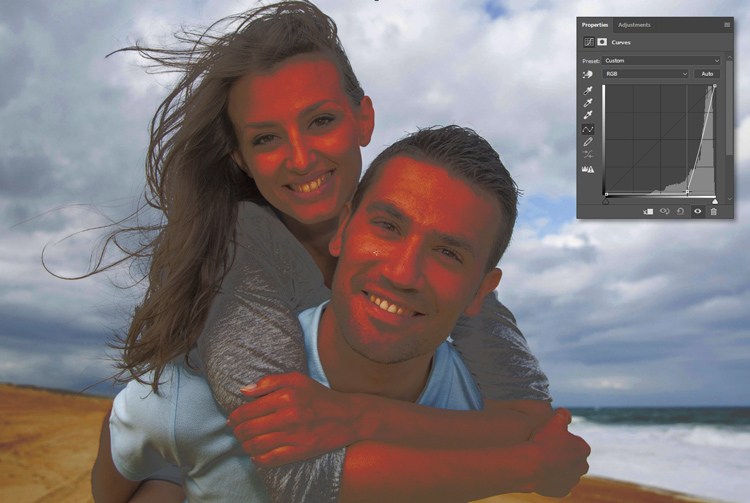
One function in Photoshop, is the luminosity selection of an image which are the bright pixels. Those bright pixels can be selected by using the shortcut – Command+Option+2 (Mac OS) or Ctrl+Alt+2 (Windows) on your keyboard. The luminous selection can also be found from the channels panels,
Simply by holding Cmd/Ctrl and click the RGB thumbnail. Once the selection is active, create an adjustment layer and apply it to the layer Mask.
 The brighter pixels of the photo gets targeted by the adjustment layer, which you can manipulate or play around you will notice the brighter pixels are only being affected but not the dark ones.
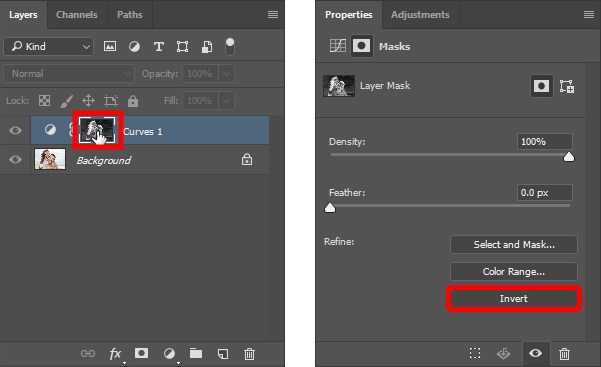
 Similarly you can also target the dark pixels. To make any adjustments on the dark pixels you can do it by just clicking the invert options from the Properties Panel as shown below.
 The retouch would give the following
2. Spot Healing
Face marks, spots, wrinkles and blemishes can be quickly removed by the brush tools in the Photo Shop. With this function those spots can be removed easily especially. Sometimes some dark spots or blemishes, wrinkles on an image creates a slight distraction to the viewer. First, make your judgments those spots with the skin tone, whether darker or brighter?
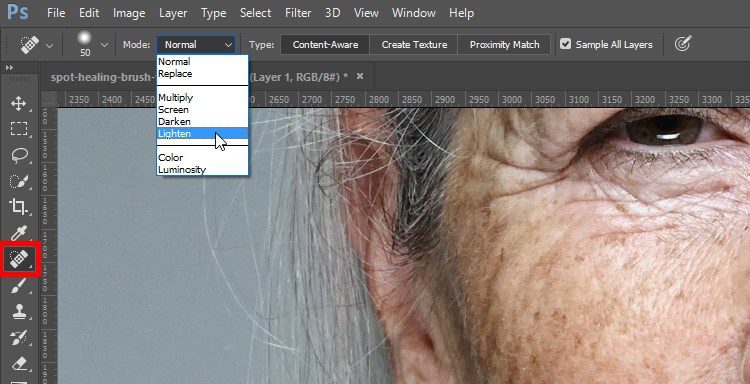
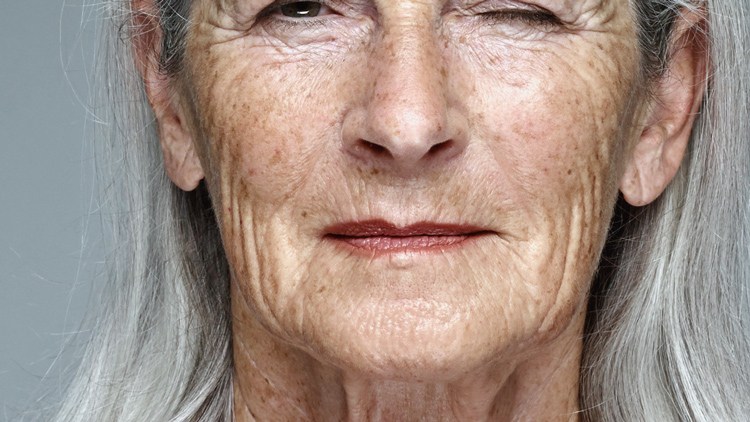 You want to work on those wrinkles. Lighten up those wrinkles when they are darker with respect to the skin tone. Go to the Spot Healing Brush Tool from the Options Bar, then click Content-Aware, you will find a drop-down menu and then select Lighten. Shown in the following
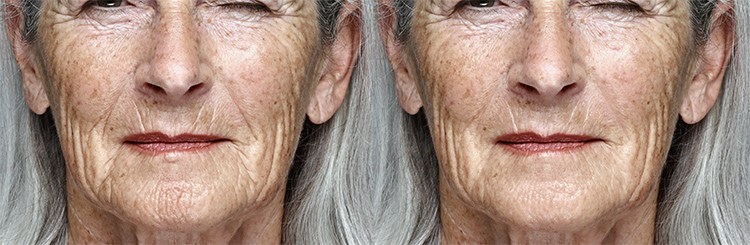
 Use the small brush to paint the wrinkly parts in small strokes to remove them. You will not lose the image quality here, as the spot healing brush tool specifically removes darker pixels as such as blemishes, dark face spots. A before and after Image in the following as such
 And if you happen to find blemishes or wrinkles above the lip, make the adjustments with the skin tone, as you may darken or lighten it from the Mode drop-down menu.
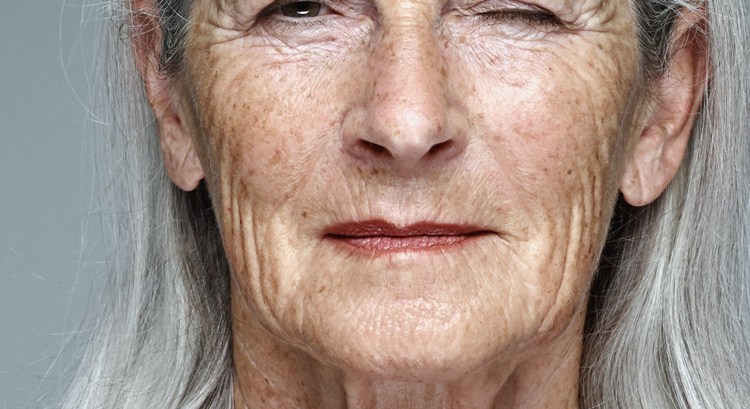
A final heal to the outcome in the following,
3. One image in two windows
When working with an image, one technique you can follow is to open the same image in two separate windows and keep them parallel to each other. This is useful to edit images, as you keep the windows side-by-side, you can work on the details and can keep track of the overall changes you have made. This is also helpful when you are work with two monitors as well. To open the same image on two separate windows is simple and easy.
Just click to Windows –> Arrange (New Window/Name the document). And then go to Window –> Arrange –> Two Up Vertical… This will allow you to open two separate tabs next to each other. And then you can use the zoom function to zoom in and out from one and the other window, as your edit suggests. The following image would help you understand.
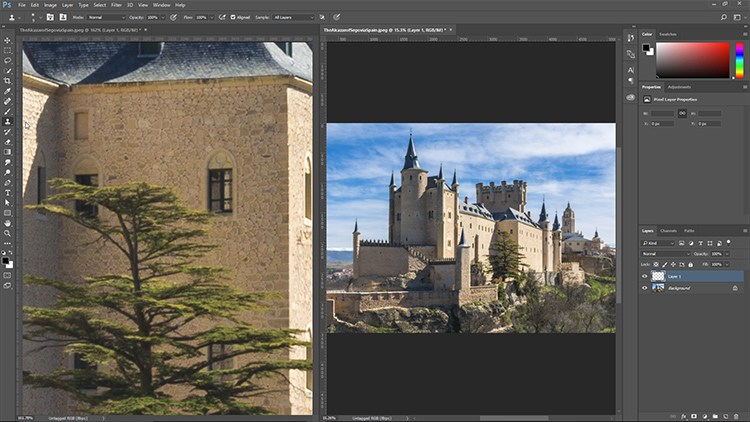 The picture above as you can see, you can make two windows of the same document. Any adjustments to one picture will reflect on the other at the same time.
4. Selections and Color Assortments
Color assortment is an important tool in photo retouching. The color assortment in Photoshop can be found from the panel by the Color Range command. This function is very useful when sorting or selecting complicated areas of an image.
Color Range is not effective when working on a complicated image which may not give you the result as you want. However, the image may contain too much information but your focus is working on one specific area. In doing so, you can use the Color Range on a specific area of the image and select in a rectangular form which is ideal.
 The next step, go to Select –>Color Range. You will notice the Color Range is now focused on the rectangular selection you made earlier.
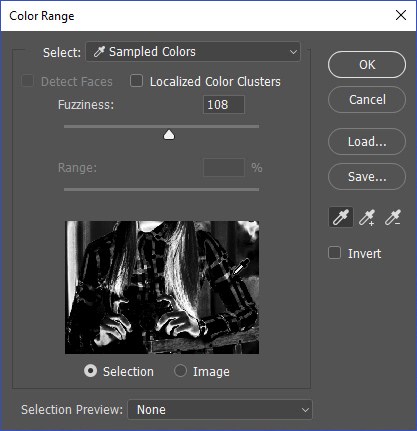 Here as you see, use the eyedropper to select the Red color of the T-shirt, and then use the slider to adjust Fuzziness of the selection.
You want to be careful here in this image as you select the color of the railing and the skin tone is quite similar which becomes difficult to ignore when you are focusing on the Red color. But not to worry, the Lasso Tool helps you to deselect those areas around the picture by only selecting the Red Color of the Shirt.
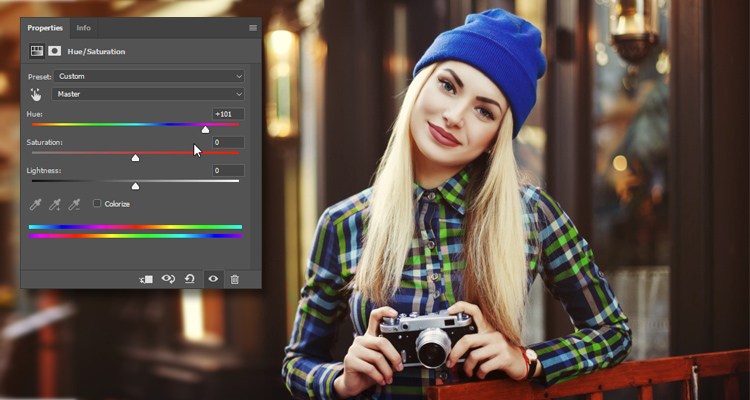
 Having the Selection once, you can make further adjustments via the sliders. You can make Hue and Saturation Adjustments of the Red Color of the shirt. You can move the slider up and down and can notice the changes. Shown below
5. Lab Color Mode
As you work on the Photoshop, you will be familiar working with the RGB or CMYK functions. There are other color modes that are useful and also come in great use on certain situations. While retouching image you can use the Lab Color Mode. Simply go to Image –> Mode –> Lab Color, the color mode will be enabled and you change the color of the photos accordingly.
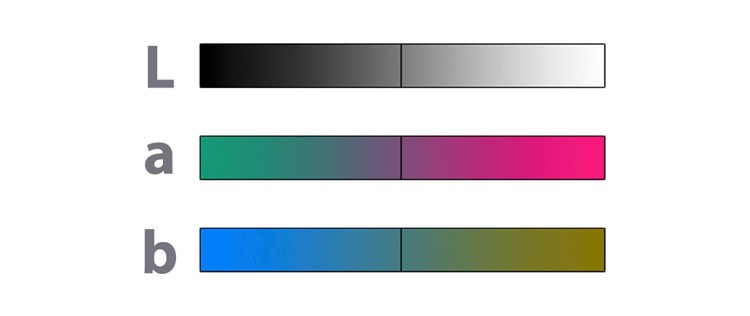
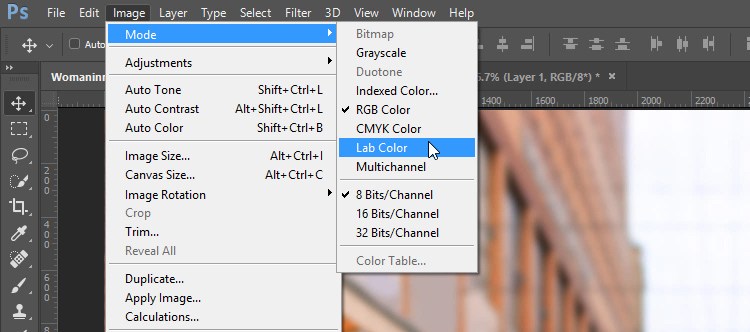 There are 3 Channels in the Lab Color Mode
LIGHTNESS – Contains Luminance Values.
A – Is affiliation between two colors Green & Magenta
B – Is affiliations between the colors Blue & Yellow
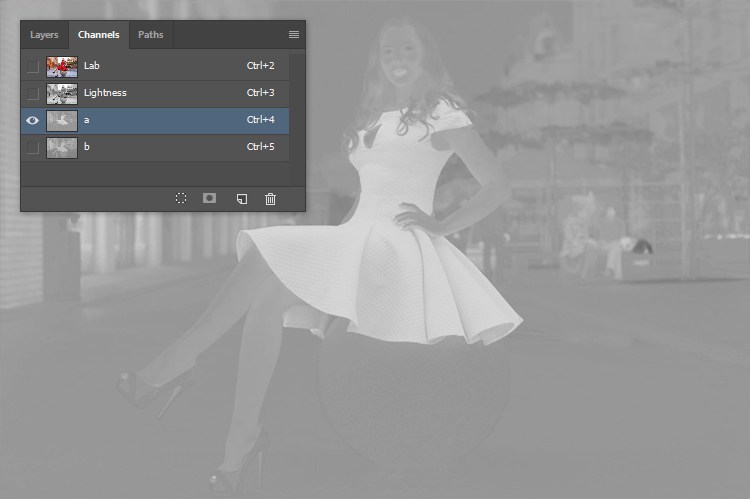
 The advantage of using the Lab Color Mode is, it separates the luminosity from the color. This allows you to work on the color patterns without distorting the details of the image.
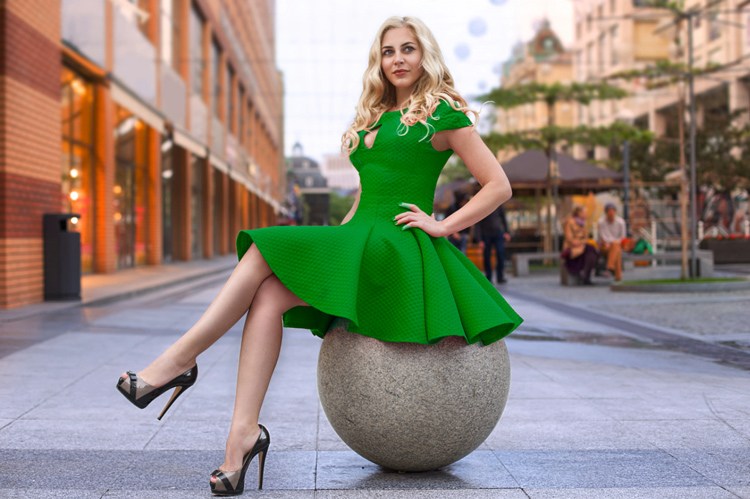
 For instance, in the picture above the Red Dress color could be changed to green by duplicating the layer. Hence from the Chanel Panel, by selecting “A”- Press Cmd/Ctrl + I you can invert the channel.
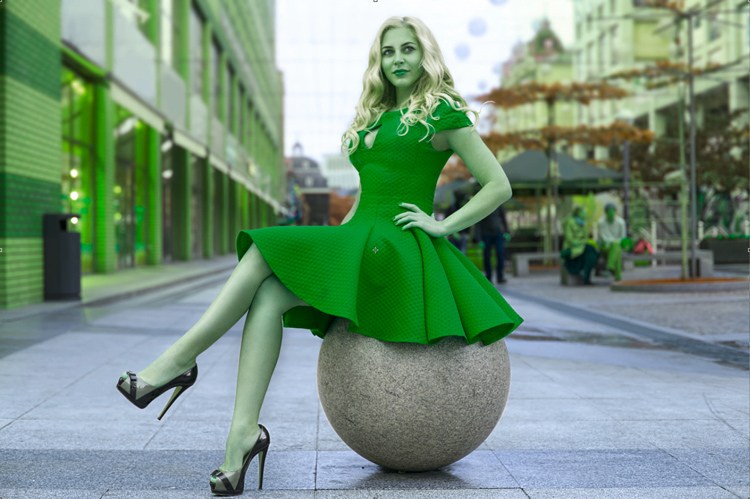
 The following image is the outcome, leaving the image intact
 Furthermore, with the help of the Lab Color Mode you can change the color of the dress by using the Layer Mask – to select the dress only. And also sharpen the Image with the sharpening filter without affecting the Picture. In case if you want to make the Image more noticeable you can use the Lightness Channel to target the Dress, demonstrated below.
 I hope these tricks and technique are helpful when you are retouching or editing Images. Good Luck!
About the Author: Garlak Theodorakis
 My name is Garlak Theodorakis, I am graphic designer with almost 10 year experience in the field. Founded Tooft.com in january 2010 with idea to share my knowledge with the world.


Excellent! It is an amazing post you have published here. It must be very informative! I have seen your post carefully and enjoy it. I am very impressed with your article, tips, and tricks. Hope that you will share such an effective post regularly, Thanks.